Company accounts with myUSCIS allow multiple members of a company to access to the account, review forms, and suggest edits to the collaborating attorney.
The Company Group has two main entities: an Administrator and Members. Each Company Group has at least one Administrator. Individuals with the “Administrator” label are the only ones with the authority to sign, pay for, and submit forms. Company Groups may have multiple Members. Members are employees within the Company Group that can help prepare the filings but do not have signatory power or the ability to pay for or submit forms. It is important to plan the creation of your Company Group ahead of time, to ensure that the individual with signatory power is properly identified as the Administrator in your account.
1. Identify the signatory within your company. This individual will become the Administrator and create the Company Group.
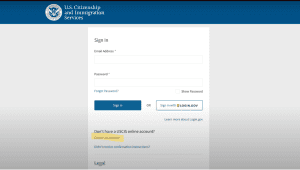
2. The Administrator will visit http://www.my.uscis.gov and select “Sign Up.”
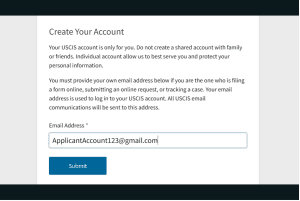
3. Enter your email address and confirm your email address. Be sure to use a company email address that you check frequently, as this will be the email that will be used on your forms and where USCIS will send you updates on any petitions filed. Click “Sign Up.”

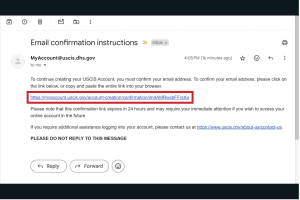
4. An email will be sent to the email address you entered. Check your email and confirm your myUSCIS account by clicking the link in the email.
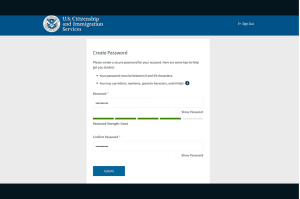
5. Create and confirm your password. Select submit.
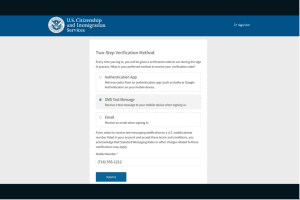
6. You will be prompted to select a two-step verification method. Select how you would like to receive verification codes to login to your account in the future. Click submit.
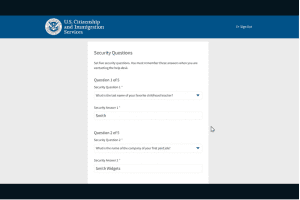
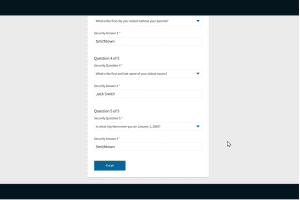
7. You will then be prompted to select password reset questions. Select 5 questions from the list and provide your answers. Click submit.
8. Next, you will select your account type. Here, select the final option “I am part of an organization or company, a sole proprietor, or an agent.” Click submit.

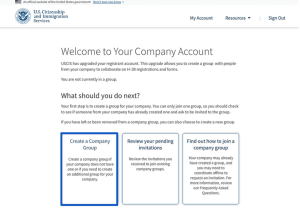
1. When first logging in, the Administrator will see three options. Click “Create a Company Group.”
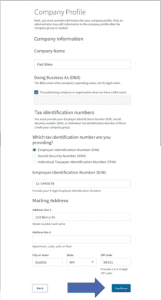
2. The Administrator will be prompted to create a Company Profile. Enter the following information and click “continue”:
3. The Administrator will then be prompted to create a Personal Profile. Enter the following information:

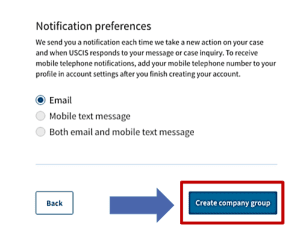
4. The Administrator will again be prompted to choose how they would like to receive one-time PINs for two-step login verification. Choose an option. Then, click “Create company group.” Note: If you have not been designated an Administrator for your company – do not continue.
A Company Group has now been created. The Administrator’s home page will allow them to invite both Members within the company and Legal Representatives to collaborate with their Company Group.

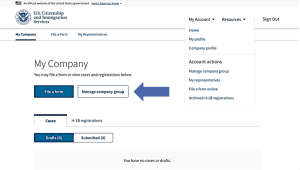
1. To add Members, the Administrator should look under the “company” tab at the top of their home page and click “manage company group.
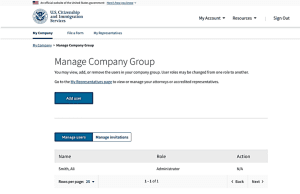
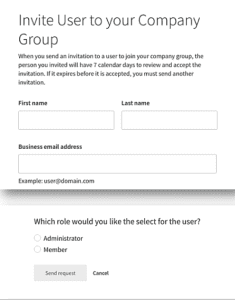
2. Click “add user” and enter the invitee’s first and last name and email address. Then, assign the invitee the role of either Administrator or Member.
3. Invitees will be sent an invitation to the email address entered. Invitees should click “sign in or create an account.” Note: invitations are valid for only 7 days. The next steps need to be completed within 7 days of receiving the email invitation.
4. Invitees will take the same steps as the Administrator in creating their myUSCIS account. They will automatically be linked to the Company Group with the role assigned to them.
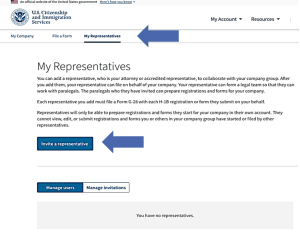
1. To add a Legal Representative, the Administrator should look under the “my representatives” tab at the top of their home page and click “invite a representative.”
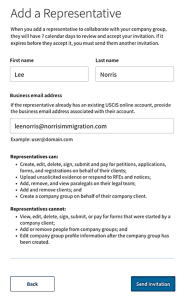
2. Enter the Representative’s first and last name and email address. Choose “send invitation.”
3. Representatives will then be sent an email prompting them to collaborate with your Company Group.
It is important to note that Legal Representatives can only edit forms that the Legal Representative begins. If anyone within the Company Group starts a form, the Representative will not be able to view, edit, sign or submit that form.
Creating a Company Group through myUSCIS allows our clients to efficiently give suggestions on the forms, collaborate within their own organization, and ultimately saves the company money on costs and fees. If you have any questions regarding the create of a Company Group, the roles within the Company Group, or your eligibility to file online after reading this post, please feel free to contact us here: https://drbimmigration.com/contact-us/

U.S. Customs and Border Protection (CBP) has the authority to search electronic devices at U.S. entry points, including phones, laptops, and tablets—without a warrant.…

It’s important to understand your rights if ICE comes to your door. This guide provides essential information on how to protect yourself, what to…

Attorney Elizabeth Rompf Bruen will be speaking at the upcoming AILA Chicago Chapter’s Conference on the important topic of ethically leveraging technology to improve…
I went through my Green Card and Citizenship applications with Elizabeth Rompf and every step of the way was fantastic. Incredibly professional, prompt, clear, and very attentive to details. I cannot recommend them enough! They're my absolute top pick for any immigration recommendations!
DRB helped us with securing a work visa for one of our staff members, communicated well, and helped explain the process.
I am full of gratitude while writing this review for Delgado Rompf Bruen Law. Thank you so much Marta for handling my case so beautifully. It has been only your diligence and professionalism in the work which guided my case to success. I am very fortunate to have you as an attorney. With other attorneys I've experienced ones who only...
Elizabeth and her legal team were extremely helpful in my husband's green card case. They had us so prepared that the interview was a piece of cake. We didn't have a single issue. They were quick to reply to any questions we had and were very honest with us about any possible issues we could have. I would highly recommend...
I began working with Martha after a decade of having my immigration process handled by attorneys that worked for my employers and everything changed immediately. Martha was invested in my personal story and circumstances and took all the time I needed to talk me through the options and process. She was consistently professional, knowledgable, and compassionate. She even leveraged her...
I've struggle for over 10 years to get my Permanent Resident status and have been represented by 4 immigration lawyers over that period. The last one I hired and who was able to resolve my immigration case is Elizabeth Rompf Bruen. The contrast of how she handled my case and the other 3 lawyers was obvious from the beginning. She...
Marta was the most professional, accurate and caring lawyer I’ve encountered in the 6 years I’ve been living in the US, her work ethics are unmatched and without doubt was the best decision for my process. I recommend her to anyone that needs help, you will feel listened and she is incredible when it comes to explaining this procedures in...
Elizabeth has been my immigration attorney on multiple cases. She handled my 3 different cases over past 7 years including the recent immigration case that got approval last month. Whenever I need attorney help, the only person I reach out to is Elizabeth. She is knowledgeable and very professional in handling any case. Elizabeth always kept me informed about the...
Elizabeth helped me file, process and ultimately successfully complete my Naturalization "journey" to become an American citizen. There were bumps on the road as the process is time-consuming, confusing (to me) and frequently frustrating... But Elizabeth (and her staff) were always responsive, clear, knowledgeable and reliable. I am today an American citizen and I would recommend her services to anyone...
We contacted Martha after reaching out 3 immigration lawyers and having terrible experiences. When it comes to immigration issues it is easy to play with peoples’ hopes, Martha was fresh air. Since the first call, Martha was straightforward and realistic, she thoroughly explained the rules that applied, most common/possible outcomes in my case, time frames and the requirements I had...